L663 Defender Cargo Floor Heat Mitigation and Fridge Slide Installation
Discover how to overcome the L663 Defender's rear cargo floor heat issues. This technical DIY guide covers thermal barrier installation, structural floor plate fabrication using factory anchors, and safe fridge slide integration without drilling into hybrid batteries or fuel tanks.
The L663 Rear Cargo Floor Thermal Challenge
The L663 Land Rover Defender (comprising the 90, 110, and 130 variants) is an exceptionally capable overlanding platform. However, self-building touring owners quickly encounter a significant engineering quirk: excessive heat build-up under the rear cargo floor. The vehicle's exhaust system, specifically the massive rear silencer and muffler assembly, is positioned directly beneath the rear loadspace. During long highway stints or low-speed, high-load off-road crawling, this exhaust radiates immense thermal energy upward into the aluminum body tub. Because the factory floor has minimal thermal insulation beneath its plastic or carpeted cargo trim, surface temperatures inside the cabin can regularly climb above 45°C (113°F) in moderate ambient conditions.
For owners running 12-volt compressor fridge/freezers, this thermal transfer is more than just an inconvenience—it is a critical system efficiency issue. Compressor fridges rely on shedding heat via their built-in condensers. When the base of the fridge is mounted directly to a hot floor, or bolted to a metal slide that acts as a thermal bridge to the body tub, heat conducts directly into the lower refrigeration cabinet. This forces the compressor to run almost continuously to maintain target temperatures. The result is a massive increase in amp-hour consumption, accelerated wear on the compressor, and a significantly shortened runtime on auxiliary battery systems.
Implementing Effective Underbody and Cabin-Side Thermal Barriers
Mitigating this thermal transfer requires a comprehensive, dual-layer approach utilizing both external reflection and internal cabin isolation. On the underside of the vehicle, directly above the rear silencer, the factory aluminum heat shields offer basic radiant protection but suffer from heat soak during extended trips. DIYers can supplement this by applying heavy-duty, adhesive-backed embossed aluminum heat barriers (such as those containing a silica or ceramic core) directly to the dry, degreased underbody metal sheets. It is vital to maintain a minimum 20mm air gap between the exhaust components and any added insulation material to prevent heat trapping and potential material degradation.
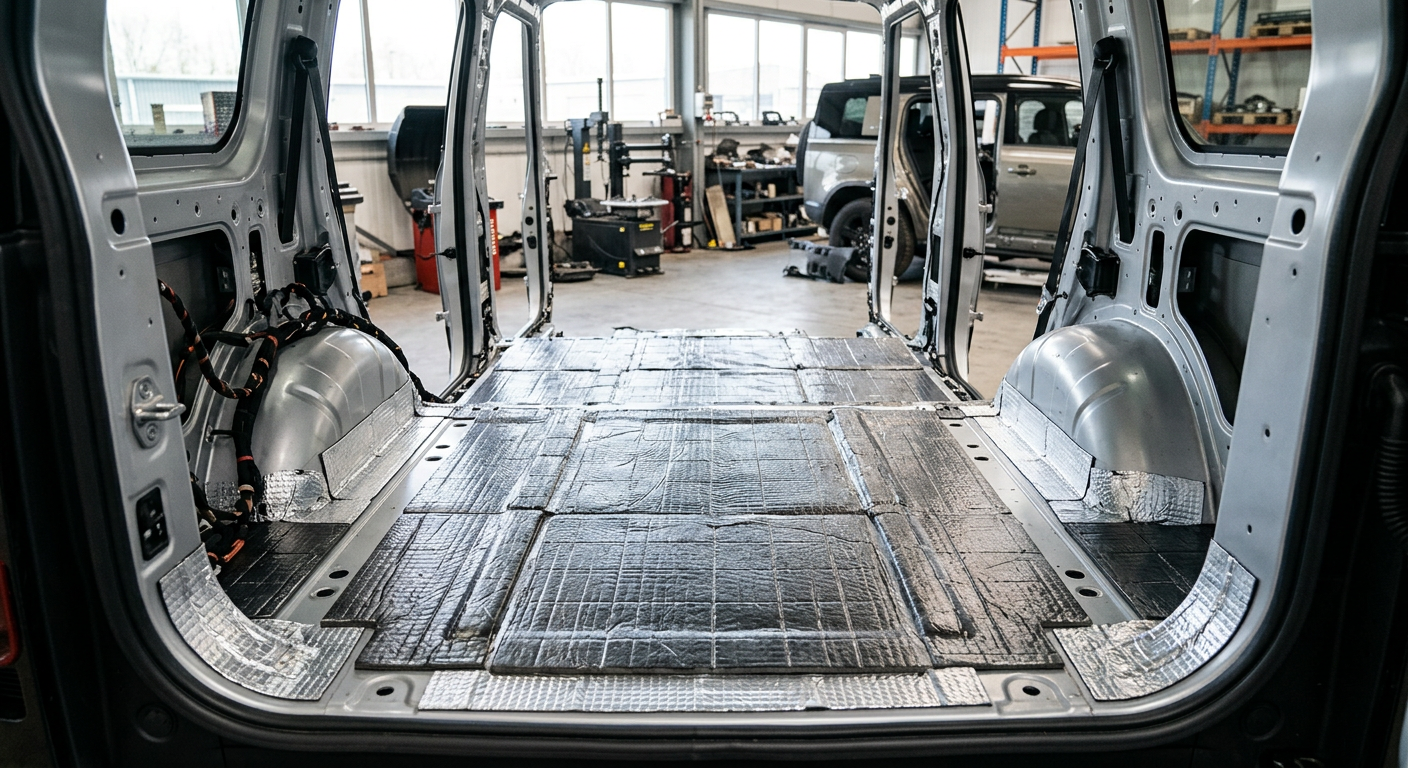
Inside the cabin, the factory plastic floor panel or carpet must be completely removed to access the bare aluminum sheet metal. To establish an effective thermal break, start by applying a high-quality butyl-based acoustic dampener directly to the flat sheet metal panels to control panel resonance. Over this base layer, install a dedicated closed-cell foam thermal barrier with a reinforced, reflective aluminum foil face, aiming for a thickness of 6mm to 12mm. This layer must be precisely trimmed around the factory seat brackets, wiring harnesses, and threaded inserts, ensuring a continuous thermal barrier across the entire cargo floor footprint to block conductive and radiant heat transfer.
The Hazard of Drilling: Understanding the L663 Sub-Floor Layout
When planning to secure a heavy fridge slide or drawer system, DIYers must adhere to one strict rule: never drill mounting holes through the L663 cargo floor. Traditional body-on-frame 4x4s often have void space beneath the loadspace sheet metal, but the L663 monocoque architecture packages critical vehicle components into every spare millimeter of the sub-floor chassis. Directly beneath the thin aluminum cargo floor sheet metal sits the main fuel tank, high-voltage electrical conduits, evaporative emissions lines, and complex wiring harnesses.
Furthermore, on Mild Hybrid (MHEV) models—such as the D300, P400, and P400e—the 48-volt lithium-ion battery pack and its associated coolant lines are located directly underneath the rear cargo floor area. Puncturing any of these components with a drill bit or a self-tapping screw can cause catastrophic damage, including high-voltage electrical hazards, coolant leaks, fuel tank rupture, or thermal runaway in the hybrid battery. To secure aftermarket accessories safely, you must exclusively utilize the factory-engineered structural mounting points provided by Land Rover.
Engineering a Solid Bolt-In Sub-Floor Plate
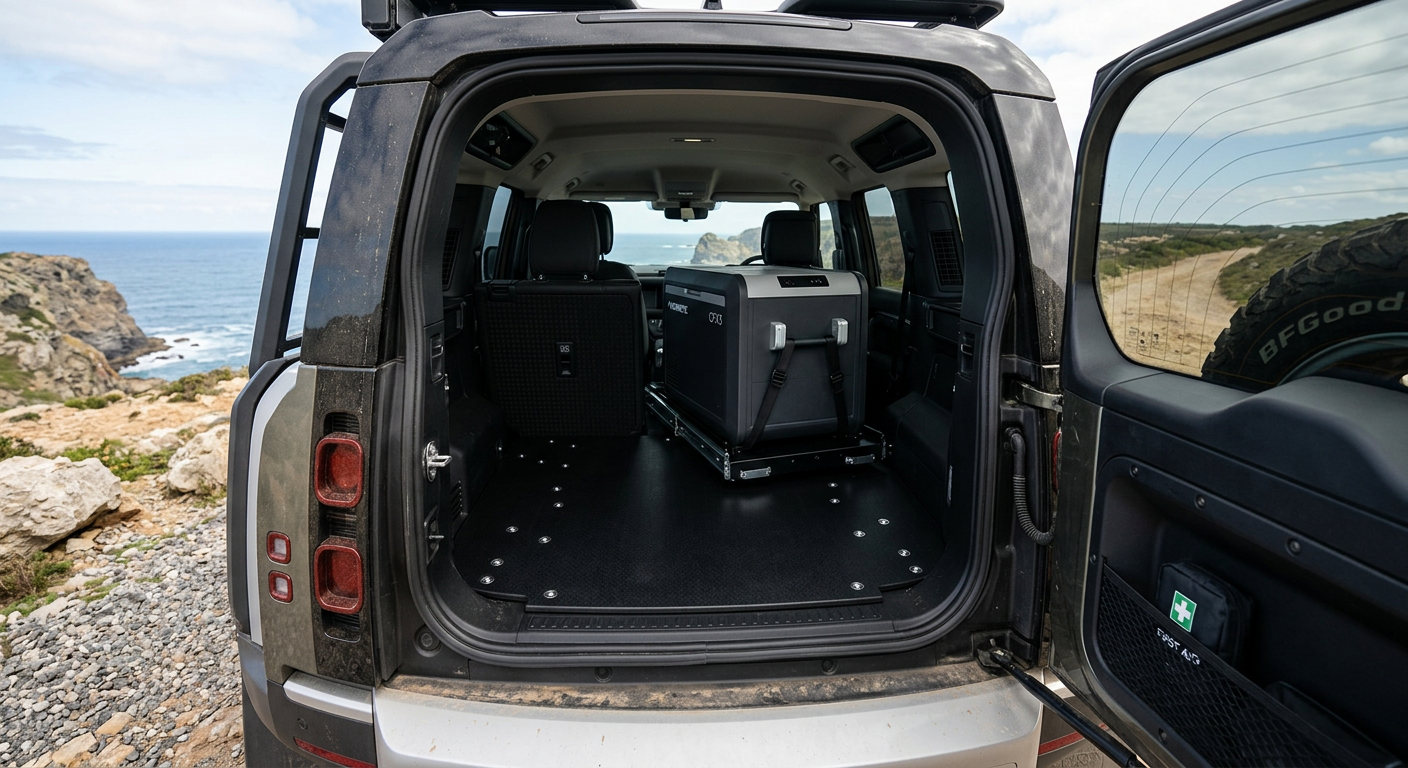
To mount a fridge slide securely without drilling, you should fabricate or install a custom structural sub-floor plate. Typically constructed from 12mm to 18mm marine-grade birch plywood or CNC-cut 6mm structural aluminum sheet, this plate acts as an intermediate mounting surface. To anchor the plate, begin by removing the factory cargo tie-down D-rings. These D-rings are held in place by heavy-duty M8 Torx fasteners threaded directly into structural steel nuts welded into the monocoque chassis. These four points are engineered to withstand high dynamic loads, making them the perfect anchors for a heavy cargo plate.
Measure and drill countersunk holes in your custom sub-floor plate that align precisely with these factory M8 threaded holes. Use high-tensile (Grade 8.8 or higher) countersunk M8 machine screws to bolt the plate down through your newly installed thermal insulation layers, ensuring the bolts are long enough to engage at least 12mm of thread into the chassis. Once this structural plate is rigidly secured to the vehicle, you can safely use tee-nuts (T-nuts), threaded inserts, or blind Rivnuts installed from the underside of your custom plate to bolt down fridge slides, drawer slides, and tie-down rails without any risk of damaging the underlying vehicle systems.
Selecting and Aligning the Correct Fridge Slide
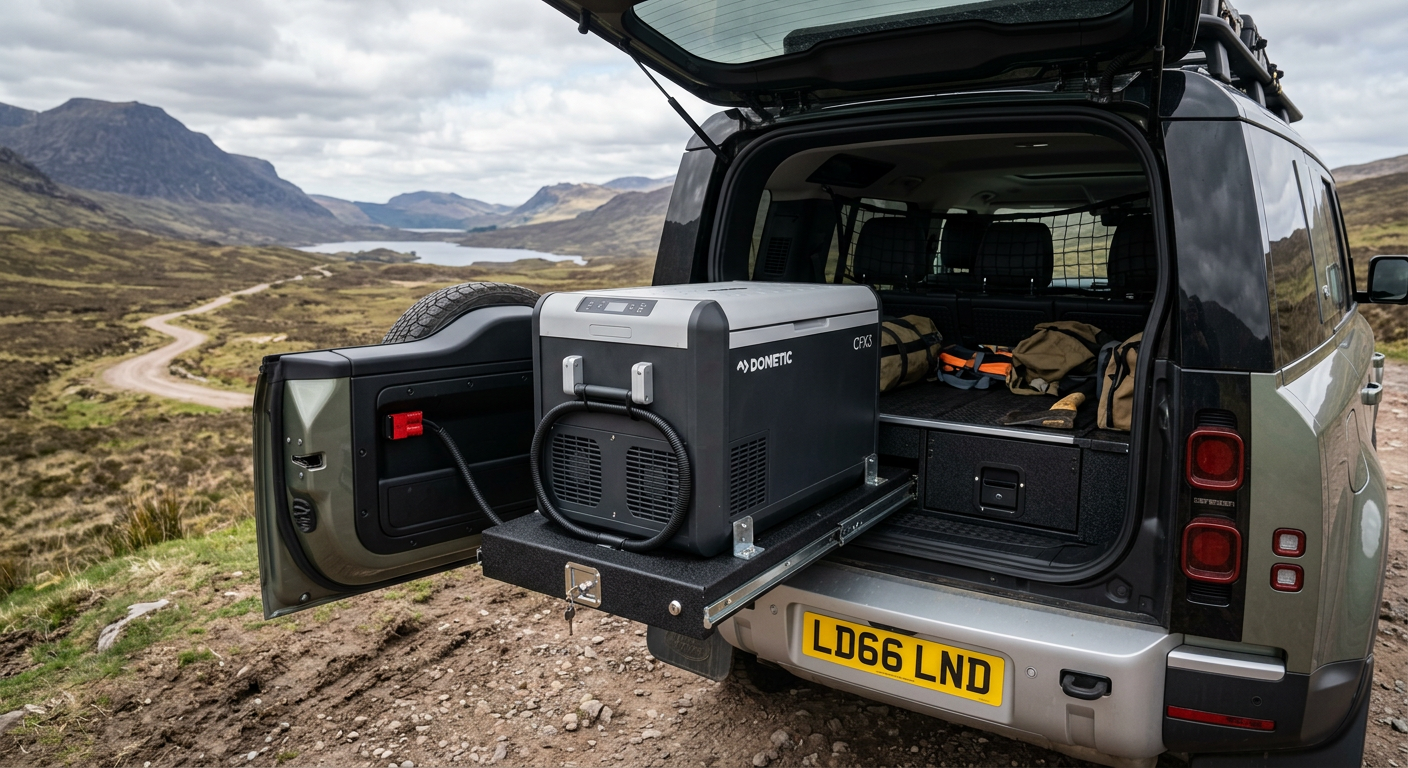
With a secure sub-floor plate installed, you can proceed to fit the fridge slide itself. Depending on your touring setup and cargo needs, you will choose between a standard linear slide, a tilting slide, or a heavy-duty drop-down slide. Drop-down slides are highly favored in the Defender 110 and 130 due to the vehicle's high floor height, which can make accessing a top-loading fridge difficult for shorter users. When positioning the slide on your cargo plate, always perform a dry run with the fridge loaded onto the slide to check clearances in all directions.
A common installation error involves ignoring the profile of the L663 rear tailgate door when closed. The inner door trim, integrated speaker pods, and the protruding door latch mechanism curve significantly inward into the cargo area. If the fridge slide is mounted too close to the rear edge of the cargo floor, the door will strike the front handle of the fridge or the slide's locking lever, preventing the tailgate from closing and latching. Always allow a minimum of 50mm of clearance between the rearmost point of the fridge assembly and the fully closed door trim. Bolt the slide to the sub-floor plate using at least six M6 or M8 high-tensile bolts secured with nylon-insert lock nuts (Nylocs) on the underside of the wood or aluminum plate to resist off-road vibrations.
Managing Airflow and Electrical Routing in the Loadspace
The final step in a professional-grade installation is ensuring adequate ventilation and safe power distribution. 12V compressor fridges extract heat from their cooling circuits and exhaust it into the cabin through small built-in vents, typically located near the compressor housing at the rear or side of the unit. In a fully packed overlanding setup, gear can easily shift and block these vents. If the fridge re-inhales its own hot exhaust air, its cooling efficiency drops. Maintain a minimum of 75mm of free airspace around all compressor vents, and consider installing a metal cargo barrier or fridge cage to prevent soft bags or recovery gear from sliding against the ventilation grilles.
For power delivery, route heavy-gauge wiring (minimum 10 AWG / 6mm² copper core to minimize voltage drop over the run) from your auxiliary power source or fuse block to the cargo area. Avoid using standard 12V accessory sockets, as they are prone to vibrating loose on rough tracks, causing connection failure and spoiled food. Instead, mount a high-current, vibration-resistant connector, such as a 50A Anderson plug, flush into the side trim panel or directly onto the sub-floor plate. Ensure the power lead going to the fridge has an adequate service loop wrapped in protective split-conduit, allowing the slide to extend fully to its stops without putting any physical tension on the electrical connections.